Canvas - The Beginning
This is an expedition into generative art using JavaScript and the HTML canvas. It is not, however, an HTML or JavaScript tutorial. It’s a diary of a deep dive into both the nature of generative art and the use of canvas for its expression. Putting it in writing, and words, helps me bring clarity to my journey. But a collateral audience might be someone who knows a little JavaScript, or is willing to pick up the basics, and who wants to explore the possibilities of creating art with code with me. If that’s you, welcome!
To me, generative art is a form that plays in the borders between intent and discovery. I will try to articulate my thoughts on this in time. There is something very special, I think, in the disciplines and boundaries that play between rules and chaos, between control and freedom.
The approach for this series is old school. There are a gazillion libraries, engines and frameworks that offer to make working with canvas easier. But the canvas api is not all that difficult and working with it directly imparts a certain economy and precision.
Creating visual designs this way requires only a simple page of minimal HTML with a canvas tag:
<!DOCTYPE html>
<html lang="en">
<head>
<title>Canvas Example</title>
</head>
<body>
<canvas id="canvas" width="150" height="150"></canvas>
</body>
</html
The <canvas> tag really only has two attributes, width and height, and they are optional, defaulting to 300 and 150 pixels respectively. There’s a third attribute: “id”, which is not really a canvas property per se but a handle HTML uses to reference it from JavaScript or CSS.
To draw something on the canvas with code requires a little JavaScript and it can be included from a file:
<!DOCTYPE html>
<html lang="en">
<head>
<title>Canvas Example</title>
</head>
<body>
<canvas id="canvas" width="150" height="150"></canvas>
<script src="draw.js"></script>
</body>
</html
The <script> tag loads the file “draw.js” from the same directory as the html page and executes it.
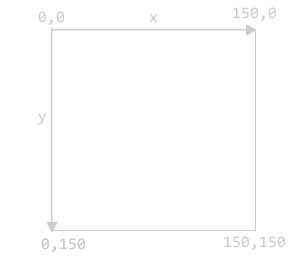
The canvas tag defines a rectangular surface with dimensions of height and width in a browser that code can then scribble on. The canvas coordinate system starts with x=0 and y=0 in the top left corner of the canvas. So a canvas with a height and width of 150 pixels would have these x,y coordinates:
To start drawing on the canvas JavaScript needs a reference to the canvas tag using its “id” attribute. There can be multiple canvases on a page, each with different ids. Obtaining the reference is illustrated in the following code, which first grabs the canvas id and then uses it to create a drawing
context:
var canvas = document.getElementById("canvas");
var ctx = canvas.getContext("2d");
ctx is assigned a canvas context; a context returns different tools based on whether it is writing to a canvas in 2d mode, which is the most widely supported, or 3d, also known as webgl which later projects will delve into.
Using the ctx object returned from the request, we can access functions which will write directly on the canvas.
And this is enough of a start to make something interesting. In generative art, it’s often fun to start with just a handful of elements and constraints and see what happens. This project will use only:
- rectangles and the 3 functions that draw rectangles in the canvas api
- colors - for both the strokes (the outline) and the fills (inside area) of the rectangles
- random numbers - injecting the essential “discovery” element into the generative art piece
- and nothing else, canvas-wise
A rectangle is the “hello world” of canvas drawing; there are 3 functions that create them:
fillRect(x, y, width, height)
draws a rectangle filled with the current fillStyle, defaults to black if no fill was specified.
strokeRect(x, y, width, height)
draws a rectangular outline with the current strokeStyle.
clearRect(x, y, width, height)
clears the specified rectangular area, making it fully transparent.
The two color styles mentioned above can be assigned colors in the format used by CSS.
fillStyle = “#ff0000”; // set to red
fillStyle = “red”; // also sets to red using css predefined color names (see link above for all the valid names)
strokeStyle = rgb(255,0,0); // same deal, sets to red using another css color construct
strokeStyle = rgba(255,0,0, 0.5); // sets to a red with an opacity of 50%
lineWidth = 2; // how many pixels wide the stroke is, defaults to 1
The ctx variable pulled from canvas can now be used to access all the functions in the canvas api. To draw a red rectangle at coordinates 50, 50 on the canvas:
ctx.fillStyle = "red";
ctx.fillRect(75, 75, 60, 60);
And before running this, adding this css in the
section in the HTML will show the boundaries of the canvas more clearly to help see where in the canvas objects are being drawn:<style type="text/css">
body {
margin: 20px;
background-color: #202020;
}
canvas {
border: 1px solid white;
}
</style>Which creates this:
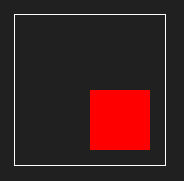
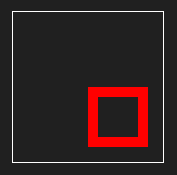
Notice the the x,y coordinates of the box starts at 75, 75 which is the exact center of the 150x150 canvas. The box isn’t centered though because the x,y coordinates is where the top, left of the box starts, not the middle. Now to punch a transparent hole in the middle of that red box:
ctx.clearRect(105,150,20,20);
and finally, draw a rectangular outline:
ctx.strokeStyle = "red";
ctx.lineWidth = 3;
ctx.strokeRect(95, 80, 20, 50);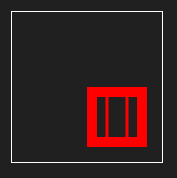
Putting it all together, the final example above was created with the following HTML:
<!DOCTYPE html>
<html lang="en">
<head>
<title>Canvas Example</title>
<style type="text/css">
  body {
    margin: 20px;
    background-color: #202020;
  }
  canvas {
    border: 1px solid white;
  }
</style>
</head>
<body>
<canvas id="canvas" width="150" height="150"></canvas>
<script src="draw.js"></script>
</body>
</html>and the following JavaScript (in draw.js):
var canvas = document.getElementById("canvas");
var ctx = canvas.getContext("2d");
ctx.fillStyle = "red";
ctx.fillRect(75, 75, 60, 60);
ctx.clearRect(105, 150, 20, 20);
ctx.strokeStyle = "red";
ctx.lineWidth = 3;
ctx.strokeRect(95, 80, 20, 50);The last piece needed before cutting loose and making some cool stuff is a little helper function added to the Javascript that will return a random integer between x and y inclusively:
function randomIntBetween(min, max) {
  return Math.floor(Math.random() * (max - min + 1) + min);
}
Enough to get started… let’s make some art with rectangles using fills, strokes, colors and coordinates and random properties. Here’s what I built. Comments in the code should explain what was done. If you (i.e. that one guy or gal that tripped across this page while searching for blue arctic foxes) decide to make something, please post a link in the comments, which goes for all the following parts of this journey as well.
Playing with Rectangles
Left click on the canvas to generate a new pattern. Right click and save to save the image. Click Open Controls to change the parameters. (Don’t click the Rerun button that appears from CodePen unless you want to reset all the parameters.)
See the Pen Triangle Spirals by Kentskyo (@kentskyo) on CodePen.